
An artificial grass wall is a great way to add some life and color to any home. You can choose from many different colors and styles of artificial landscape materials for the look you want in your room.
These eye-catching pieces of decor are well-suited for any home. They bring an explosion of color to any space with their vibrant hues that never go out style or trend!
Artificial grass walls bring brilliant colors into your home without being too bold about it.
We all know how easy it can be to take things from drab browns and grays when you want something lighter so these decorative items will brighten up anywhere they’re placed!
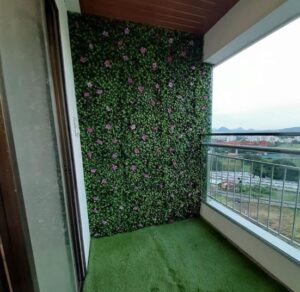
As a new trend in the world of architecture, vertical artificial grass walls offer homeowners with a relatively easy installation and instant change.
One thing is for sure: as more people become aware that these type of grasses are available to purchase outside or inside their homes, they will be interested in installing one themselves! In fact, it’s so popular you might even want to install your own at home.
Once you make the decision to install an artificial grass wall, where do you begin?
What is it like and how does one install such an awesome project that changes your home’s scenery dramatically.
Vertical Artificial Grass Wall Installation
Here are 7 easy steps to installing artificial grass on your wall:
1. Preparing the Wall Surface
The synthetic grass needs to be installed over a clean wall surface. Loose paint or debris on the surface will not allow the turf to grip securely and could cause the turf to slide, shift, or move during installation.
- Use a soft-bristled brush to remove loose paint or debris. To get into corners and crevices, use a small artist’s brush or a toothbrush.
- If the paint is peeling off, you can use a putty knife to scrape it off. If you don’t have one, you can use the back of a butter knife.
- Once the loose paint is removed, wipe down the walls with an all-purpose cleaner and water to remove any remaining residue.
2. Ensuring a Level Wall Surface
Making sure your wall is straight and smooth will make the installation process easier and it will save you money. If your wall is not level or smooth, it can cause problems with your installation.
It will make the artificial grass look bad. If you have a wavy wall, the artificial turf will be uneven and bumpy. It will be harder to install. The artificial grass may not stick to the wall as well as it should.
It could also tear easily if it’s not level or smooth enough for installation.
Here’s how to ensure you’re working with a level wall surface:
- Place the level on the wall at a point where it will be parallel with the floor.
- Slide the level down to the bottom of the wall, and make sure that it is still parallel with the floor. If not, adjust by moving either end of your artificial grass until it is straight.
- Repeat this process all along your wall until you have checked every section for straightness and smoothness.
3. Measurements
Measure the length of each wall and multiply these together in order to calculate the total area you’ll need to cover with turf.
If you need precise measurements, you can even use a marker to mark the area where you will install the turf.
4. Artificial Grass Pieces or Rolls?
For smaller rooms, go for individual artificial grass tiles. These are an easy option when assembling a space and they can be used both indoors or outdoors.

You can choose a roll-out artificial grass product to make backgrounds should you want to use it in larger rooms or to fill your entire wall.
5. Cutting the Grass
Cut the turf according to your measurements and remove all excess material from the backing of the turf (it’s easier this way).
You can use scissors or a knife for this step, depending on how much you need to cut off. A serrated knife is ideal for cutting through thick layers of material like artificial turf.
If you are using tape, it’s best if it’s double-sided tape so that there is no need for glue/adhesive which can be messy and leave residue behind when removed later on.
6. Installing Artificial Grass on Your Wall
Peel back one side of the backing of the turf and stick it onto your wall in an area where you have marked out with your marker earlier on (you might want to use painter’s tape first before sticking the turf onto the wall).
Make sure that you press firmly onto the surface so that no air bubbles appear between the backing and surface of your wall (you might want to roll up a magazine or towel and place it against your hand while pressing down firmly).
Once done, peel off the other side of the backing from your artificial grass/turf and carefully align both sides together as well as possible, making sure there are no wrinkles or creases in between these two pieces of material (if they do exist, try smoothing them out with your hand).
Try not to stretch them too much because synthetic fibers tend to lose their shape easily when stretched beyond their elasticity point; instead, just push them into each other gently but firmly until they are completely aligned together without any noticeable creases or folds in between them.
Finally, peel off any excess backing material from either side so that only about 1-2 inches remain along one side – this will act as an anchor point for securing a piece of double-sided tape later on once we have finished installing our artificial grass/turf onto our walls!
Continue this process until you have covered up all areas where you had marked out earlier on with your marker pen!
You should now have a seamless piece of artificial grass/turf covering up most areas where you had marked out earlier… but don’t worry if there are still some visible gaps here or there – we will fix those shortly! 🙂
7. Covering Holes and Visible Wall Parts
In order to make the artificial grass/turf blend in with the wall behind it, we need to make it look like there is a shadow cast on the wall from the artificial grass/turf.
To do this, you will need to grab a piece of cardboard and cut out a rectangle that is slightly smaller than your artificial grass/turf piece.
Now take a spray bottle and fill it up with water and spray the back of your cardboard rectangle with water.
This will make the cardboard easier to bend into shape. Get spray paint that matches the color of your artificial turf, and spray the piece of card board.
Now place your cardboard rectangle behind your artificial grass/turf piece, making sure that it covers up any gaps or holes.
Now using some duct tape, tape down one side of the cardboard onto the wall so that it stays in place while you are working on it.
Next, grab some scissors and cut off all of the excess pieces of cardboard at the bottom – you don’t want any hanging over or sticking out as this will be visible.
You can also use an exacto knife to cut off any extra bits if you want… but scissors work just fine.
8. Securing Artificial Grass to Your Wall
You’ll need to secure your artificial grass onto your wall in some way. This is an important step, as it will ensure that your turf stays in place and doesn’t fall down or move around.
There are a few different ways you can do this; we recommend using either nails, staples, or adhesive tape.
Nails
Nails can be used for most types of artificial grass. You’ll want to use at least one nail every foot along the edges of your turf and every two feet in the middle of the turf (you can go more often if needed).
Make sure that when you’re hammering the nails into place, that you don’t hammer them too hard or else they may pierce through your turf!
Staple Gun
If you’re using artificial grass with a backing on it, then we recommend using a staple gun to secure it to your wall. The best method is to use staples every two feet along the edges of your turf and every four feet in the middle of your turf (again, go more often if needed).
You’ll want to make sure that when securing with staples, that you only push them through half way so they don’t come out on their own later on!
Adhesive Tape
If you’re using artificial grass with no backing on it, then we recommend using adhesive tape for securing purposes. This type of tape is very easy to use and works well for all kinds of artificial grass.
The best method is to use tape every three inches along both sides of your lawn’s edges and every six inches throughout its center (go more often if needed). You’ll want to make sure that when securing with adhesive tape, that you wrap each piece around itself twice so it stays in place better!
How Do You Clean Artificial Grass Walls?
Here’s how to clean artificial grass walls:
1. Use a spray bottle filled with water to spray off the walls. If you have a pressure washer, use that to make the job easier and faster.
2. Use a stiff-bristled broom or brush to remove loose dirt and debris from the surface of the wall.
3. Mix together one part bleach and two parts water in a bucket, then use this mixture to wipe down the artificial grass wall.
This will kill any germs or bacteria, and it will also help clean up any stains that are on the wall.
4. Rinse off the bleach solution using your garden hose, then let everything dry before returning your pet back into his home.
How Do I Stop My Artificial Grass Smelling?
Here’s how to stop your indoor artificial grass walls from smelling:
1. Wash the artificial grass regularly with a hose and clean water.
2. Use a good quality detergent to wash the walls, especially if there are stains or spills on them.
3. Use a good quality air freshener after washing the walls to get rid of any smell that may be left behind from the detergent or dirt that was washed off the wall.
4. You can also use an ultraviolet light to kill bacteria and viruses on artificial grass walls, which will help reduce odours as well as prevent mould growth in your indoor artificial grass wall.
FAQs
Can you put artificial grass on a wall?
Yes, you can. If you have a room that is not used very much and you want to make it more attractive, then putting artificial grass on the walls is a great idea.
Artificial grass can be installed on any type of wall – brick, concrete or plasterboard. The only thing you need to do is to make sure that the surface is smooth and flat so that the artificial grass will stick to it properly.
How do you stick artificial grass on a concrete wall?
This is a very difficult task to do, but it can be done. The best way to stick artificial grass on a concrete wall is to cut the grass into strips and then attach each strip to the wall with double sided tape.
This will allow you to create a seamless look when you are finished and you won’t have any seams. It may be more difficult than other methods, but it will be worth the effort in the end.